Wednesday, October 27, 2010

Things To Make and Eat

I love food. LOVE LOVE LOVE! I am not a diet girl, nor am I a low-fat girl. And I was never a weight-watching girl until after I had kids, when suddenly, my body needed help from me to stay in shape. And then I started exercising rather than give up my favourite foods! I'm not much of a cook though, so this is incredibly ambitious for my culinary skills!


So here's some of the yummiest things I want to try...


Healthy Fruit Roll Ups
Carrot Bread
Easy Brownies (I've made these and they're a favourite. They're so simple, and the best thing is they use cocoa instead of chocolate... which saves me all the trouble of trying not to eat the chocolate before it goes into a recipe!)
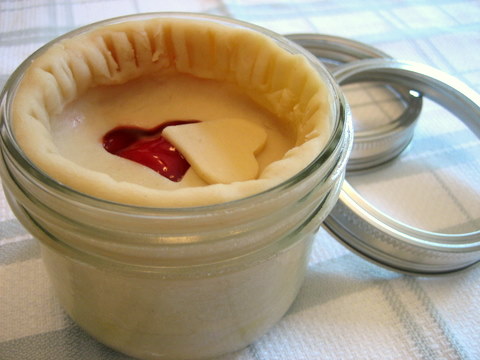
Pie In A Jar
Chocolate Mint Brownies
Treacle Tart

5 Minute Chocolate Mug Cake
 The Holy Cow! Cake
Pizzookies

 Gingerbread Men (would you believe I have NEVER made gingerbread men? EVER?)
Cherry Ripe Mud Cake


White Chocolate Cheesecake (my cousin actually made us one of these with her Thermomix - it had an Oreo base and was sooo yummy with her home-made (Thermomix-made) raspberry sauce! Since I probably won't be able to convince my hubby to buy me a Thermomix in this lifetime, I found a simple recipe to try instead. And yes, I will be replacing the plain crust with an oreo one!


Peanut Butter Cups
Baklava - one of my favourite treats! 

Strawberry Shortcake


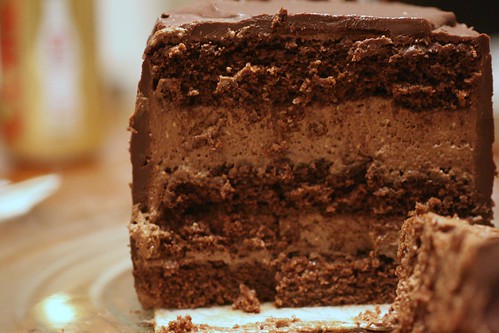
Chocolate Mousse Cake (I haven't posted a link to this, because I want to try my Aunty Gail's recipe. It was a must at Christmas, birthdays or any family gathering we could use as an excuse to eat it!) If she lets me :) I will post it here on my blog... when I get around to making it!


Hmmm.... and almost everything I've posted is some kind of dessert....


Wednesday, October 20, 2010

Things To Make and Do List

As I have mentioned before, I am such a blog stalker. I just can't get over the fun, inspired projects and ideas other people come up with and then generously share with the rest of the internet world! Especially since I'm not very original AT ALL. I'm excellent at copying things and adapting other people's ideas, but I've kinda given up on being original, because everything I've thought up on my own, I've then seen later on, on someone else's blog. 

But here, is a BIG fat list of all the projects that I intend to try... sooner or later! Actually, it's not that big. This isn't all of it! And, because I'm such a blog addict, I'll constantly be adding things to my to-do-list!

Make a Nativity
I want to use some of the ideas here at New Dress A Day to make myself some summer dresses! Fun!
Gathered Flower Handbag
These awesome Winter Beanies for the kids
How cool is this playroom! My kids don't have a playroom, but I think it would be cool to put some interactive things on their walls instead of just plain paint and pictures.
A "Miss" version of Felt Mr Potato Head 
Felt Flash Cards 
Table Tent 
Gorgeous Baby Blankets 
Mail Sorter to adapt a little to use as a paperwork organizer in Brook's office 
Mermaid Costume 
Fairy Play Set  
Hemp Vases 
Most of the Wearable Tutorials over at Schwin&Schwin 


And this list of ideas that has been on my to-do list forever, but isn't necessarily online - or the vision in my head isn't anyway, so I may post some tutorials for some of these when I eventually get round to making them!

Hanging Nativity Frame
Advent Calendar
Christmas Stockings
Re-cover the couches
Table Runner for the piano
Bedspread for our bed
More cushions
A bassinet set
Cushion Cover and Library Bag for Kembry
Stacking shelves for the pantry
Hat Organizer
Hanging Door Organizer
Boxers for the kids
A Mermaid Costume for Kembry
Aprons for kids and I
Basketball clothes for Cumoram
Scrap T-Shirt
A Gumnut Wreath
Dollhouse Restoration x2
Bookshelf re-do
Re-paint the kids drawers
Finish (or re-fashion) the hundred-and-one UFP's (Unfinished projects) I have stashed away... or at least slowly work my through them... and try not to add anything else to the list!
Plant a vege garden and build raised garden beds
Make a head board for our bed
One year, I am going to do a Halloween Party. Halloween isn't a big deal here in Aus (compared to the US - although the shops pretend it is), but it looks like so much fun!
A portable, cardboard dollshouse (a la Better Homes and Gardens)

Saturday, October 16, 2010

Baby Bath Mitt Tutorial


You will need
  • The pattern (click on the picture below and then print it - I hope it works! - or just draw your own by tracing around an oven mitt)
  • Terry toweling. I used a hand towel I got from Kmart for $1, and got two bath mitts out of it (but if I cut each piece separately instead of two at a time, I could get 3). Recycle a towel you have at home or pick up a fun coloured towel from the op shop or a discount store like Red Dot.
  • 7 x 20cm rectangle of ribbing (you can use elastic and make a casing instead if you prefer).
 1. Cut out your pattern pieces.

2. Lay your pattern pieces one on top of the other, matching up all the edges. Starting at the bottom (wrist end) on the thumb-less side, sew about two-thirds of the way up (the stopping point is marked on the pattern with an arrow, and in the picture below with a pin). Don't go all the way around, make sure you stop before you get the the curve.

3. Open out your bath mitt and lay it flat, right side up.

4. Fold your ribbing in half length-ways, and line up the raw edge with the wrist edge of the bath mitt (if you're using elastic and casing, you'd do this with your casing material - fold it in half, wrong sides together and line up the edges like you would with the ribbing).

5. Sew along the raw edge, stretching the ribbing as you go by pulling it towards you as much as you can while sewing it. This will gather in the wrist a little bit and make a snug, comfy wrist band (if you're using the casing/elastic, just sew it normally, then attach your elastic to one end. Thread it through, pull it out as much as needed to gather it in, then sew the other end into place). Overlock this edge.

6. Place the mitt right sides together again, and starting from where you left off, finish sewing all the way around the edge of the mitt. Overlock the entire edge. Its easier to overlock if you change the settings so it doesn't cut off the excess material as it overlocks, this way you'll be able to get around the difficult curves without accidentally cutting into something.

7. Turn your bath mitt right side out, and put your baby in the bath so you can use your new bath mitt!


      Wednesday, October 6, 2010

      Kids Say The Darndest Things...

      I love the funny little things my kids say and do. So here's a few of the things that have made me laugh recently...


      I was making the kids ham and cheese toasties the other night, and Cumoram was helping me by buttering the bread. Then, he started licking all the butter off the knife! I told him off and said, "Don't do that! That will make you fat and sick!"

      "But mum," he said, "You got that by having a baby."


      Brook had taken the kids to his basketball game one night to give me a bit of a break. While he was playing the game, Kembry wandered over to the canteen and said to the lady behind the counter, "Hello. Can I please have some chippies, and lollies, a power drink, and a chocolate."
      The lady said to her, "I'm sorry sweet heart, you'll have to go back to mummy and daddy and get some money first."
      So Kembry ran all the way back to where Brook had stashed his gear, rummaged around til she found his wallet, went back to the lady and presented Brook's credit card, hoping to complete her purchase!


       When my tummy started to get big, we sat the kids down to talk about the baby coming and we explained to them that my tummy was getting big because the baby was growing in there.
      Cumoram said, "Oh! And Aunty Candice is having a baby too, and so is Aunty Paige!" (Yes, they really are having babies.)
      Then Kembry pipes up, "So when is Uncle Paul having his bubba then?"


      When Brook came to pick me up from work the other night, he had his 2 year old niece and Kembry in the car. As soon as she saw me, his niece yelled at the top of her lungs, "Hahaha! Look at Aunty Mesha, got big big fat tummy!"
      Kembry turned around and said indignantly, "No, my mummy has a baby in her tummy!"


      Kembry spread a blanket on the lounge room floor, arranged her play food on it then asked all her friends (every teddy and doll in the house) if they would like to come to her picnic. She came out with an armful of toys and announced that some of them had said no, so they were staying in the room. Then she put each toy on the blanket, handed each one a plate and a fork (colour coordinated), and gave each toy some play food to eat, then stood up and said, "Hello friends! Welcome to my picnic!" 
      I heard her say, "No, you can't have any cake because you haven't eaten your salad!"


      Cumoram: "Why do only mummies have babies and not daddies?"


      I was reading The Eleventh Hour by Graeme Base to Kembry one night and asked her if she could count from one to eleven.


      "Yes I can," She said. "One... to eleven."


      I walked into the lounge room one night after checking my emails and facebook, to find that Cumoram had fallen asleep on the couch and Kembry had drawn all over his face in green felt-tipped pen. She looked up at me and said, "Paper now, please." As if she'd just used his face for a practice run! (Picture to come)


      Brook and I woke up to this one Saturday morning. The kids had woken up early, decided they wanted breakfast and helped themselves to a whole jar of nutella!


      Tuesday, October 5, 2010

      "My Shoes Keep Falling Off!"


      Kembry loved these little sandals that I bought for her in Bali during our last trip. But that trip was in the middle of our Aussie winter (still hot and sticky in Bali though), so only now is Kembry able to start wearing them. So the other day she put them on to take Cumoram to school and as we're walking through the school grounds she says, "I can't mummy. They hurt coz they won't stay on." It was a very disappointed little girl who had to take off her shoes and walk barefoot, and put on a different pair when we got home.

      So, I took her to our local Spotlight and bought her about one and a half metres of matching ribbon. 

      I poked a hole on each side of the strap using a seam ripper, then used the snips to widen it a little bit...
        
      I used tweezers to push the ribbon through the hole...


      Pulled the ribbon through and tied a knot in it. I used Fray-Stop on the ends to stop them from fraying and to sort of help glue the knot in place so it wouldn't slip.


      I did the same thing to the other side and then the other shoe, and in 5 minutes, here's a pair of cute little beaded sandals, that are now even cuter and more comfy with satin ribbon ties to tie around her little ankles and keep them from slipping off. The beading on the shoes was enough to hide the knots in the ribbon. I love when adorable little things become even more adorable, and now they're just a little bit more practical :) And yes, as soon as I can actually get her in the shoes AND pose for a photo I will post one !


      Saturday, October 2, 2010

      How To Fix A Tear

      One of the most useful things I learned how to do was to fix a tear. My hubby and kids are really hard on their clothes, which is annoying, but hubby also has "favourites" that if I didn't know how to repair them, he'd just keep wearing them as they are.  Hubby has just informed me that they are not favourites, they're just convenient to wear all the time!


      So, using these well-loved convenient shorts of hubby's that I have (again) been asked to repair, I'll show you how to fix it (well, the way I do it anyway).


      1. Find a piece of scrap fabric you can make a patch out of, and cut a patch a little bit bigger than the tear. Ideally, you want the patch fabric to be a similar colour and weight to the item of clothing you're fixing, but it doesn't really matter too much, I just used whatever happened to be lying around, which in this case was grey denim.


      2. Cut a piece of Vliesofix (paper-backed fusible webbing) the same size as the patch. 


        3. Iron the Vliesofix to the patch to fuse it (remember to make sure it's glue-side down! Talking from experience...) and then peel away the backing paper.


      4. Turn the item of clothing inside out and iron the patch over the tear.
      Instead of using the Vliesofix, you can use an iron-on patch, cut it to size and iron it on. Or, use plain fusible webbing. Cut it to size, put it over the tear, put the patch on top and iron into place. 


      5. When I was originally shown how to do this, they showed me how to use a straight stitch, going backwards and forwards, gradually working my way across the tear or hole. I've since switched to using a wide-ish zig zag stitch with a narrow stitch length, because I find it easier and quicker.


      So, turn the item right side out again and position the needle at the top left of the tear (I find it easier to start there and work my way across and down). 


      6. Using the zig zag stitch, stitch all the way down to the bottom of the tear. When you get to the bottom, leave your needle down in the fabric, lift the presser foot and turn the fabric (it will pivot around the needle so you don't have to reposition the needle) so that you can sew back in the opposite direction.


       7. Then stitch all the way down again. Keep this line of stitching as close as possible to the line you just did (I like to overlap them a bit). Keep doing this until the tear is covered and secure.


      I did it on a piece of denim with white thread to help you see better...


      Leave the needle down in the fabric, lift the presser foot and pivot the fabric around so you can sew back up the tear again...


      Sew back down the tear...


      Overlap the line of stitches a little bit, then keep going til the tear is covered and secure.


      This is what it looks like on the inside... 


      And there you are, no more hole! Though I guarantee you this won't be the last time I'll be repairing these shorts!